Full Crawl keeps running rather than an Incremental Crawl

I discovered a strange issue with my SharePoint 2010 Farm that uses FAST Search 2010 as its search infrastructure. The issue related to my content source continually running a full crawl rather than an incremental even though the crawl schedules were set correctly. There was nothing obvious to say there was a problem as the full crawl completed but took longer than expected and all other content sources looked to run correctly using an incremental.

I started out troubleshooting the environment and going through the main health checks detailed below:

  • SQL: Check to see if there are any locks on the crawler and content dbs
  • SharePoint Crawl Servers: Check to see if the CPU or memory is maxing out of running consistently high.
  • FAST Search: Check to see if the index is healthy by running “Indexerinfo status -a” on the FAST Servers” and see if the number documents that are active match the total. Ensure to check both the primary and backup indexer in your results from running the command in powershell for fast search.
  • FAST Search: Check through the logs in %FAST SEARCH%\var\log and in particular the ‘configserver.log’ and ‘all.log’ on the FAST admin server.

After checking through the main troubleshooting points, you can run a perfmon trace to get more information, but instead I ran through my install notes and also checked through the details of Kristopher Loranger’s blog ‘FAST Search for SharePoint 2010 Crawler Troubleshooting’ to  uncover the issue.

From the ‘configserver.log’ file I found numerous entries relating to the error below.

“the ping call resulted in the following exception: socket.error: [Errno 10060] The operation timed out.”

This namely pointed to a communication error between the fast search admin server and the indexing servers. From my install notes and the blog from Kristopher Loranger, a communication error would usually relate to a TCP offloading issue on the FAST Search Servers. TCP Offloading should be disabled on your FAST Search and SharePoint servers as it doesn’t work effectively with IPSEC.

I checked the TCP offloading settings using the command “netsh int ip show global, and the settings were correct. Chimney Offload State = Disabled.

Image1

Then I checked the offloading settings on the network card layer… This is where the problem lay. All the entries with ‘Offload’ were enabled. This was changed when the VM was moved to a different host so definitely one to watch for when migrating servers.

Image2

So to resolve the issue, change all entries with ‘Offload’ in the property name and reboot all the fast servers. Ensure you disable your crawls before following through with this task.

The Microsoft Blog on TCP Offloading is really useful going through the detailed steps in TCP offloading for your FAST Search environment.


SharePoint – ‘Modified By’ does not get updated for an item

An issue was reported to me relating to a site collection whose Modified By information for their item in their lists would not update leaving the original name of the person who uploaded the file as the “Modified By” person. This was a consistent issue across all lists within only one particular Site Collection. All other site collections were working as expected.

After searching for the solution, it was discovered that the issue I was having was the same as discovered by Marc D Anderson (Link) and Victor Butuza ((Link).

Marc D Anderson – Item ‘Modified By’ Value Doesn’t change: Fixing a Damaged Column Schema

Victor Batuza – Modified By Column does not get updated

To diagnose the issue from the articles above to confirm I was having the same problem, I used SharePoint Manager 2010 to inspect the schema.xml of the site collection and a particular site collection. Please air on the side of caution on using SharePoint Manager as you don’t want to make changes to properties using this tool without knowing exactly what you are doing. Please use it on a copy\backup of the web application you are looking to diagnose.

What the schema should look like:

<Field ID=”{d31655d1-1d5b-4511-95a1-7a09e9b75bf2}” ColName=”tp_Editor” RowOrdinal=”0” ReadOnly=”TRUE” Type=”User” List=”UserInfo” Name=”Editor” DisplayName=”Modified By” SourceID=”http://schemas.microsoft.com/sharepoint/v3” StaticName=”Editor” FromBaseType=”TRUE” />

What my schema.xml actually looked like:

<Field ID=”{d31655d1-1d5b-4511-95a1-7a09e9b75bf2}” Name=”Editor” SourceID=”http://schemas.microsoft.com/sharepoint/v3” StaticName=”Editor” Group=”_Hidden” ColName=”tp_Editor” RowOrdinal=”0” Type=”User” List=”UserInfo” DisplayName=”Modified By” ReadOnly=”TRUE” Version=”1” />

As you can see from the above FromBaseType=”TRUE” was missing from my schema.xml. Next, I used the excellent powershell scripts from Marc D Anderson blog to diagnose how many lists were affected.

  1. Diagnose how many Lists are affected:
$siteURL = "http://siteurl"
$site = Get-SPSite($siteURL)
$errors = 0
$thisWebNum = 0
foreach($web in $site.AllWebs) {
$thisWebNum = $thisWebNum + 1
write-host $thisWebNum " Web " $web.Url  " Created on "  $web.Created
$listCounter = $web.Lists.Count
for($i=0;$i -lt $listCounter;$i++) {
$list = $web.Lists[$i]
$thisListNum = $i + 1
write-host "(" $thisListNum "/" $listCounter ") [" $list.Title "] Created on "  $list.Created
$f = $list.Fields.GetFieldByInternalName("Editor")
if ($f.SchemaXML -NotMatch 'FromBaseType="TRUE"')
{
$errors = $errors + 1
write-host "  Issue in schema " $f.schemaxml
}
}
$web.Dispose();
}
$site.Dispose();
write-host "TOTAL ISSUES: " $errors
  1. Fix one Document Library to test the fix

Once you have identified the number of document libraries that are affected affect, you will now need to update the document libraries schema.xml and add the FromBaseType=”True” to each one. To do this manually is an arduous task, so powershell is your friend here. Try it for one document library first and test it. This is explained is much more detail in Marc D Andersons blog so I won’t go over the details. But you will need to update the webappurl, sitename and list name before you run it.

IMPORTANT: Before you do any work on the list to fix it, it is important to have a backup of your content databases and run the fix on a copy of your web application so you are happy with the process. Then schedule downtime to put the fix in place on production. This is standard operation procedure, but still has to be mentioned.

$s = get-spsite http://webappurl
$w = $s.OpenWeb("SiteName")
$l = $w.Lists["ListName"]
$f = $l.Fields.GetFieldByInternalName("Editor")
write-host "BEFORE field at " $w.Url  " List "  $l.Title  "  is " $f.schemaxml
#add at the end of the schema the needed string and update the field and list
$f.SchemaXML = $f.SchemaXML -replace '/>',' FromBaseType="TRUE" />'
$f.Update()
$l.Update()
write-host "FIXED field at " $w.Url  " List "  $l.Title  "  is " $f.schemaxml
$w.Dispose();
$s.Dispose();
  1. Update all Lists with the Fix

Now that you have tested the fix, you now need to update the fix on all your lists. Run the powershell below on your site collection:

$siteURL = "http://siteurl"
$site = Get-SPSite($siteURL)
$errors = 0
$thisWebNum = 0
foreach($web in $site.AllWebs) {
$thisWebNum = $thisWebNum + 1
$listCounter = $web.Lists.Count
for($i=0;$i -lt $listCounter;$i++) {
$list = $web.Lists[$i]
$thisListNum = $i + 1
$f = $list.Fields.GetFieldByInternalName("Editor")
if ($f.SchemaXML -NotMatch 'FromBaseType="TRUE"')
{
$errors = $errors + 1
# fix the schema and update the field and list
$f.SchemaXML = $f.SchemaXML -replace '/>',' FromBaseType="TRUE" />'
$f.Update()
$list.Update()
write-host "FIXED field at " $w.Url  " List "  $l.Title  "  is " $f.schemaxml
}
if ($errors -gt 0)
{
write-host $thisWebNum " Web " $web.Url  " Created on "  $web.Created  " had " $errors " errors"
}
$errors = 0;
$web.Dispose();
}
$site.Dispose();
}

You can re-run step 2 to check to see if the fix has updated the schema.xml for all the lists.

  1. Test to Ensure New Document Libraries don’t have the same issue

A very good test is to check that when you create a new document library in the same site collection, that the original issue does not re-appear for the new list. If it does, then it is likely to be an issue with the site collection’s schema.xml which will need to be updated separately.

To update the schema.xml for the Site Collection, I found it easier to use SharePoint Manager 2010 as you can navigate to your troublesome site collection, go to the ‘Fields’ and find ‘Modified By’ which will be the second of the two entries and then add FromBaseType=”TRUE” to the schema.xml.

SharePoint Manager 2010 – https://social.technet.microsoft.com/wiki/contents/articles/8553.sharepoint-2010-manager.aspx

Download Link – http://spm.codeplex.com/releases/view/51438

I hope this helps people who had the same issue.

FAST Search – Repair or Rebuild your Corrupt Index from FIXML?

The FAST Search environment is a robust search solution for your SharePoint environment and once it is configured correctly and optimized then it will purr in the background surfacing rich search results for your users. However, on the rare occasion that your index gets corrupted, you as a SharePoint administrator will need to be aware of the tools and methods you can use to get it working again. If anything else, this should be part of your recovery procedure for your SharePoint environment.

So what options do you have when your index gets corrupted? Well, firstly you could completely delete the Index from SharePoint in the Search administration and via powershell on your FAST Search admin server. Or if you’re Index will take too long to re-build and will not meet your SLA then you can recover your Index using the FIXML. When FAST Search for SharePoint is indexing items it not only stores the physical index itself in the location ‘%drive%\FASTSeach\data\data_index’ but it also stores each indexed item in the FIXML in the location ‘%drive%\FASTSearch\data\data_fixml’. The FIXML contains all the information which is to become that item in the index.

Now that we know we can use the FIXML, there are two options available to you that are detailed below.

Option A – Repair a corrupt Index from FIXML

This process can be performed from any FS4SP server and on any column or row. The index reset does not rebuild the column from scratch, the indexer validates each item within the FS4SP column against the original FIXML. Any item not in sync or corrupt will be updated in the column / index.

  1. Ensure all crawls are stopped in Search Administration and the FS4SP column is idle. Use the powershell command below to show the status of FAST Search.

</p><p>Indexerinfo --row=0 --column=0 status
</p><p>

  1. Stop the web analyser and relevancy admin processes.

</p><p>Waadin abort processing
</p><p>Spreladmin abortprocessing
</p><p>

  1. Issue an Index Reset. You can re-run the second command to monitor the status or check the indexer.txt file in the logs directory (FAST Search\var\log\indexer).

</p><p>Indexeradmin --row=0 --column=0 resetindex
</p><p>Indexeradmin --row=0 --column=0 status
</p><p>

  1. Once the repair is complete, you can then resume the web analyser and relevancy admin.

</p><p>Waadin enqueueview
</p><p>Spreladmin enqueue
</p><p>

Your FAST Search Index will now be repaired and will be operational.

Option B – Rebuild an Index from XML

Ok, so you attempted Option A and this didn’t resolve your issue and your index is still corrupted. The next step is to rebuild the index from your fixml. Rebuilding the index requires a lot more disk space than option A as temporary files are created and released (within FAST Search directory) which means you are likely to consume twice as much disk space. If the disk space gets to 2GB of free space then the rebuild will fail so you will need to manage your disk space. Follow the steps below to complete this task.

  1. Ensure all crawls are stopped in Search Administration and the FS4SP column is idle. Use the powershell command below to show the status of FAST Search and keep a note of the entries “document size” and the “indexed=0”.

</p><p>Indexerinfo --row=0 --column=0 status
</p><p>

  1. Stop the web analyser and relevancy admin

</p><p>Waadin abort processing
</p><p>Spreladmin abortprocessing
</p><p>

  1. Rebuild the primary index column. Run the command from the primary indexer server to stop the processes.

</p><p>Nctrl stop
</p><p>

  1. Delete the folder ‘data_index’ within the directory ‘FASTSearch\data’ and start the services again using the nctrl command. When you start the processes the ‘data_index’ folder will be re-created and will be populated with a rebuild of the index.

</p><p>Nctrl start
</p><p>Indexerinfo --row=0 --column=0 status
</p><p>

Notice the “document size” entry, and check that the “indexed=0” is displayed as this comes from the fixml and means the index is empty. Keep re-running the status query until indexed items are at their original value. This is when it is complete.

  1. Once the rebuild is complete, you can then resume the web analyser and relevancy admin.

</p><p>Waadin enqueueview
</p><p>Spreladmin enqueue
</p><p>

Option B is now in place and complete. This will bring your FAST Search Index back online and ready for use.

SP2010 April CU stops incoming emails to a list or calendar

If you have followed my earlier post “Setting Up Incoming Mail to a List or Calendar” then you will most likely have a working incoming email configuration for your SharePoint 2010 environment. However, the laws that be at Microsoft have inadvertently released a bug in the April (2012) CU that will affect the incoming mail process.

The symptoms of this bug are that your email request will have been successfully sent through the Exchange process and arrived at your drop folder on your SharePoint web front end servers in the form of an ‘.EML’ file ready to be picked up by the timer job called ‘Microsoft SharePoint Foundation Incoming mail’. However, since the April CU was applied the .EML file will remain in the drop folder and is not picked up by the timer job. This is a frustrating bug and if you were to analyse the ULS logs a little deeper you are likely to get entries similar to the screenshot below and in particular the EventID of 6871.

The error is down to the Incoming Mail timer job somehow now being dependent on your site collection having a quota set. If you leave the site collection with the default quota of ‘0’ then the emails will fail to be picked up by SharePoint. However, this is not always consistent as I have a working SharePoint farm that is on the same farm level version with no quotas set for the site collection and incoming mail is working perfectly (very weird). So if you are unlucky to encounter this issue, then help is at hand as there are two options that you can run with which are detailed below:

Option 1: Configure your site collection with a site quota to your required specification. Once you make the changes the incoming emails that are sitting in your Drop folder will be picked up the next time the timer job has run.

Go to Central Administration > Application Management > Configure quotas and locks > Select the relevant site collection from the drop down menu > on the Site Quota Information section, set the limit to your desired number (e.g 10000 MB). Note: This be the new storage limit of your site collection so make sure have catered for future growth of the site collection.

Option 2: Download and apply the Microsoft hotfix KB2598348 which includes the fix for this bug. One thing to take into consideration for this resolution is that it will likely to bring your farm version level to July 2012 so you will need to test your new farm version in your development or staging environment to ensure it is stable for your site collections.

European SharePoint Conference Copenhagen 2013 – 5 Layers of Security


Day three of the conference and I attended a comprehensive session on SharePoint security by Michael Noel. Now I wouldn’t normally heap praise on a session like this as security does tend to have the yawn factor and I for one struggle to keep awake on the subject of SP security so yes I did bring match sticks to keep my eyes open just in case..

Michael Noel comes from an infrastructure background so the session turned out to be quite interesting. A couple of key takeaways from the session were certainly to utilise the ‘Always On’ feature of SQL 2012 and the Transparent Data Encryption (TDE) features to encrypt your database backups. TDE is a very good feature available in both SQL 2008 and SQL 2012.

The key points from the session are detailed below in the five layers of SharePoint Security:

  • Layer 1 – Infrastructure Security: Use Kerberos instead of NTLM for numerous benefits like less hops for authentication. The search service account and content access account should be different as this will stop users seeing content they shouldn’t normally be allowed to see.
  • Later 2 – Data Security: Use Transparent Data Encryption (TDE) to encrypt the database. Note that the temp database will also be encrypted so you will need a separate SQL instance if only some of your content databases are required to be encrypted. If you use RBS then you can use bitlocker to encrypt the files on the file server. However, the data in memory is not encrypted.
  • Layer 3 – Transport Security: External or internal certificates are recommended if your SharePoint site is external facing. Be aware that there is a 20% overhead on your web servers when using certs. It is best practice to load balance Central Admin and use SSL. The traffic between your web servers and SQL is unencrypted so to encrypt this transport layer you will need to use IPSEC as it encrypts all packets between servers.
  • Layer 4 – Internet & SharePoint: SharePoint is not designed to be Internet facing without a degree of protection, so forefront unified access gateway (UAG) along with an ISO/Proxy server and your firewalls would need to be in place.
  • Layer 5 – Rights Management: AD RMS is a form of digital rights management (DRM) that is used to restrict activities on files.

I hope you found this interesting and you have some takeaways that you might use in your environment or even consider as an option in the future.

European SharePoint Conference Copenhagen 2013 – Forensics for IT Pro’s

On the Tuesday of the SharePoint conference I attended an interesting session by Jason Kaczor on ‘Forensics for IT pro’s and administrators’. This session had a beware sign stamped all over it for developers as the session was mainly aimed at giving IT pro’s the knowledge and tools to check custom code (thoroughly!!) before it is deployed.

In a majority of cases issues with SharePoint is commonly caused by customisations (custom code). The issues that you are most likely to discover from bad custom code is memory leaks. Below are some bullet points on the tips and recommendations that I found useful from the session:

  • Only accept .wsp files (cabinet file) to deploy to your environment. Reject .exe, .msi and bat files.
  • If you have to deploy a msi (eg from a vendor) then unpack the file using msiexec or 7-zip and inspect the files. Deploy to your test environment first and look out for a licence file.
  • The wsp should contain a manifest.xml, which will list the solutions and features.
  • The solutions will have no version numbers, but the features do have version numbers as it is used to update/rollback a solution. Ensure the version number is an increment on the previous version.
  • If the wsp has no dll’s then the deployment will generally be safe. If you have multiple dll’s in your deployment then this is a potential risk to your environment.
  • Run SPDisposeCheck against the compiled code (DLL) which checks for potential memory leaks in the code.
  • If you have custom code already deployed to the GAC in your farm then you can use tools like windiff or winmerge to extract the structure of the files to a safe place for future reference.
  • The solution called ‘Lapointe.SharePoint2010.Automation.wsp’ by Gary Lapointe is a must have tool for any SharePoint environment. The solution runs a full audit of your SharePoint farm detailing all custom code deployed to it.

There are some very useful Static Analysis tools available for you to use to help troubleshoot and analyse custom code which I have listed below for you:

  • Fx Cop 10 – Performs static code analysis of .NET code.
  • Gendarme – Extensible rule-based tool to fine problems in .Net applications.
  • Cat.net – Is a binary code analysis tool for finding security vulnerabilities
  • Dependency Walker – Finds dll’s dependencies
  • Perfmon – Use is to find memory leaks.
  • iLSpy – Open source .Net assembly browser and decompiler.

European SharePoint Conference Copenhagen 2013 – Enterprise Search

I have finally got round to blogging about the European SharePoint conference. I would have liked to have given the excuse that it has taken this long due my hands still needing time to defrost from the Scandinavian chill but work and life have been on fast forward til now. Ok, enough of me rabbiting on, here is some feedback from the conference and in particular Enterprise Search.

As you may well know, SharePoint 2013 now fully integrates FAST Search for SharePoint into the main product as a service application (so no separate install). Below are some key points about SP2013 search from the Enterprise Search workshop I attended that was run by Agnes Molnar.

  • Fast Search now fully integrated as a service application
  • Deep refiners are not switched on by default, they have to be enabled.
  • A new hover button is available in your search results (very nice feature)
  • Document previews are only available for documents held within SharePoint.
  • Document previews not available for PDFs.
  • Managed Properties are now opened from the ‘Search Schema’ in your search administration.
  • ‘Results Sources’ now replaces ‘Search Scopes’ and ‘Federated Sources’ in search administration.
  • You can now create ‘Result Sources’ from managed properties.
  • A new feature called ‘Continuous Crawling’ can enable you to crawl your content sources continually. However, this is for SharePoint content sources only.
  • The Continuous Crawler component requires resources of at least 6-8 processors.
  • You can now delegate search administration to designated users.
  • People Search is now fully integrated into the Search application using the Fast search capabilities unlike in SP2010 where it had to use SharePoint Search only to crawl people data.
  • Better query rules, one query request returns multiple result sets.
  • Document parsing is different than 2010, the crawl component crawls every file in the content source regardless of the document extension. I believe powershell can be used to exclude certain document extensions if needed. This will mean that your ndex will be larger in SharePoint 2013, worth looking out for.

I hope this sheds a little light into the SP 2013 Search Application. Some companies will be some way off migrating to SharePoint 2013 but the more information we are aware of before migrating then the more prepared we will be.

I will have another blog on troubleshooting and the performance of SharePoint Search from the conference which will follow soon.

Troubleshooting a Memory Leak on your SharePoint Web Server

You may encounter an issue where your SharePoint web application continually falls over and you need to ascertain why! One of the questions you may need to ask is whether you have a memory leak on your web front end servers? So how do we find this out? In this instance, performance monitor is your friend and you can set up a Data Collector Set that will include the relevant counters specific to discovering a memory leak.

I have detailed below the XML code that you can use to create your Data Collector Set:

</p><p>&lt;?xml version="1.0" encoding="UTF-8"?&gt;
</p><p>&lt;?Copyright (c) Microsoft Corporation. All rights reserved.?&gt;
</p><p>&lt;DataCollectorSet&gt;
</p><p>&lt;Name&gt;SharePoint_Server_2010_Memory&lt;/Name&gt;
</p><p>&lt;DisplayName&gt;@%systemroot%\system32\wdc.dll,#10026&lt;/DisplayName&gt;
</p><p>&lt;Description&gt;@%systemroot%\system32\wdc.dll,#10027&lt;/Description&gt;
</p><p>&lt;Keyword&gt;Memory&lt;/Keyword&gt;
</p><p>&lt;Keyword&gt;Disk&lt;/Keyword&gt;
</p><p>&lt;Keyword&gt;Performance&lt;/Keyword&gt;
</p><p>&lt;RootPath&gt;%systemdrive%\perflogs\System\Performance&lt;/RootPath&gt;
</p><p>&lt;SubdirectoryFormat&gt;3&lt;/SubdirectoryFormat&gt;
</p><p>&lt;SubdirectoryFormatPattern&gt;yyyyMMdd\-NNNNNN&lt;/SubdirectoryFormatPattern&gt;
</p><p>&lt;PerformanceCounterDataCollector&gt;
</p><p>    &lt;Name&gt;SharePoint_Server_2010_Memory&lt;/Name&gt;
</p><p>    &lt;SampleInterval&gt;15&lt;/SampleInterval&gt;
</p><p>    &lt;Counter&gt;\LogicalDisk(*)\% Idle Time&lt;/Counter&gt;
</p><p>    &lt;Counter&gt;\LogicalDisk(*)\Split I/O /sec&lt;/Counter&gt;
</p><p>    &lt;Counter&gt;\Memory\% Committed Bytes In Use&lt;/Counter&gt;
</p><p>    &lt;Counter&gt;\Memory\Available MBytes&lt;/Counter&gt;
</p><p>    &lt;Counter&gt;\Memory\Committed Bytes&lt;/Counter&gt;
</p><p>    &lt;Counter&gt;\Memory\Pages Input/sec&lt;/Counter&gt;
</p><p>    &lt;Counter&gt;\Memory\Pages/sec&lt;/Counter&gt;
</p><p>    &lt;Counter&gt;\Memory\Pool Nonpaged Bytes&lt;/Counter&gt;
</p><p>    &lt;Counter&gt;\Memory\Pool Paged Bytes&lt;/Counter&gt;
</p><p>    &lt;Counter&gt;\Process(_Total)\Private Bytes&lt;/Counter&gt;
</p><p>&lt;/PerformanceCounterDataCollector&gt;
</p><p>&lt;DataManager&gt;
</p><p>    &lt;Enabled&gt;-1&lt;/Enabled&gt;
</p><p>    &lt;CheckBeforeRunning&gt;-1&lt;/CheckBeforeRunning&gt;
</p><p>    &lt;MinFreeDisk&gt;200&lt;/MinFreeDisk&gt;
</p><p>    &lt;MaxSize&gt;1024&lt;/MaxSize&gt;
</p><p>    &lt;MaxFolderCount&gt;100&lt;/MaxFolderCount&gt;
</p><p>    &lt;ResourcePolicy&gt;0&lt;/ResourcePolicy&gt;
</p><p>    &lt;FolderAction&gt;
</p><p>        &lt;Size&gt;0&lt;/Size&gt;
</p><p>        &lt;Age&gt;1&lt;/Age&gt;
</p><p>        &lt;Actions&gt;3&lt;/Actions&gt;
</p><p>    &lt;/FolderAction&gt;
</p><p>    &lt;FolderAction&gt;
</p><p>        &lt;Size&gt;0&lt;/Size&gt;
</p><p>        &lt;Age&gt;56&lt;/Age&gt;
</p><p>        &lt;Actions&gt;8&lt;/Actions&gt;
</p><p>    &lt;/FolderAction&gt;
</p><p>    &lt;FolderAction&gt;
</p><p>        &lt;Size&gt;0&lt;/Size&gt;
</p><p>        &lt;Age&gt;168&lt;/Age&gt;
</p><p>        &lt;Actions&gt;26&lt;/Actions&gt;
</p><p>    &lt;/FolderAction&gt;
</p><p>    &lt;ReportSchema&gt;
</p><p>        &lt;Report name="PAL Report" version="1" threshold="100"&gt;
</p><p>            &lt;Import file="%systemroot%\pla\reports\Report.System.Common.xml"/&gt;
</p><p>            &lt;Import file="%systemroot%\pla\reports\Report.System.Summary.xml"/&gt;
</p><p>            &lt;Import file="%systemroot%\pla\reports\Report.System.Performance.xml"/&gt;
</p><p>            &lt;Import file="%systemroot%\pla\reports\Report.System.CPU.xml"/&gt;
</p><p>            &lt;Import file="%systemroot%\pla\reports\Report.System.Network.xml"/&gt;
</p><p>            &lt;Import file="%systemroot%\pla\reports\Report.System.Disk.xml"/&gt;
</p><p>            &lt;Import file="%systemroot%\pla\reports\Report.System.Memory.xml"/&gt;
</p><p>        &lt;/Report&gt;
</p><p>    &lt;/ReportSchema&gt;
</p><p>    &lt;Rules&gt;
</p><p>        &lt;Logging level="15" file="rules.log"/&gt;
</p><p>        &lt;Import file="%systemroot%\pla\rules\Rules.System.Common.xml"/&gt;
</p><p>        &lt;Import file="%systemroot%\pla\rules\Rules.System.Summary.xml"/&gt;
</p><p>        &lt;Import file="%systemroot%\pla\rules\Rules.System.Performance.xml"/&gt;
</p><p>        &lt;Import file="%systemroot%\pla\rules\Rules.System.CPU.xml"/&gt;
</p><p>        &lt;Import file="%systemroot%\pla\rules\Rules.System.Network.xml"/&gt;
</p><p>        &lt;Import file="%systemroot%\pla\rules\Rules.System.Disk.xml"/&gt;
</p><p>        &lt;Import file="%systemroot%\pla\rules\Rules.System.Memory.xml"/&gt;
</p><p>    &lt;/Rules&gt;
</p><p>&lt;/DataManager&gt;
</p><p>&lt;/DataCollectorSet&gt;
</p><p>


So now that we have run the Data Collector Set and got our results, how do we discover if there is an issues with the memory? The information below will help you troubleshoot your results. The source information has come from an excellent blog CC Hamed who is a Microsoft Support Engineer. The blog goes into more detail so it is well worth a read.

Memory \ %Committed Bytes in Use:

If this value is consistently over 80% then your page file may be too small.

Memory \ Available Bytes:

If this value falls below 5% of installed RAM on a consistent basis, then you should investigate.  If the value drops below 1% of installed RAM on a consistent basis, there is a definite problem!

Memory \ Committed Bytes:

Keep an eye on the trend of this value – if the value is constantly increasing without levelling off, you should investigate.

Memory \ Pages / sec:

This will depend on the speed of the disk on which the page file is stored.  If there are consistently more than 40 per second on a slower disk or 300 per second on fast disks you should investigate.

Memory \ Pages Input / sec:

This will vary – based on the disk hardware and overall system performance.  On a slow disk, if this value is consistently over 20 you might have an issue.  A faster disk can handle more.

Memory \ Pool Nonpaged Bytes:

If Nonpaged pool is running at greater than 80%, on a consistent basis, you may be headed for a Nonpaged Pool Depletion issue (Event ID 2019).

Memory \ Pool Paged Bytes:

Paged Pool is a larger resource than Nonpaged pool – however, if this value is consistently greater than 70% of the maximum configured pool size, you may be at risk of a Paged Pool depletion (Event ID 2020). 

Process (_Total) \ Private Bytes:

Similar to the Committed Bytes counter for memory, keep an eye on the trending of this value.  A consistently increasing value may be indicative of a memory leak

LogicalDisk (pagefile drive) \ % idle time:

If the drive(s) hosting the page file are idle less than 50% of the time, you may have an issue with high disk I/O

LogicalDisk (pagefile drive) \ Split I/O / sec:

Issues relating to Split I/O depend on the disk drive type and configuration.

Making SharePoint Search Available in Windows Explorer

In SharePoint 2010 there is a nice little feature in a search site called a ‘search connector’ that enables you to run search queries from Windows Explorer. The search connector is displayed in your favourites drop down. Also, you can have more that one search connector if you have a number of different search sites configured in your SharePoint environment and name them accordingly e.g Intranet Search, Team Site Search etc.

Below are the details of how to set up a search connector:

1) Run a search query from your search site (Any OOTB search site) and click on the third icon below which will be at the top of your search results and slightly to the right.

2) Select ‘Add’ to the Add Search Connector prompt’.

Your Search icon will now appear in your Favourites menu in Windows Explorer. The icon can be renamed accordingly.

Setting up Incoming Mail to a List or Calendar in SharePoint 2010

In SharePoint 2010 there is the capability to enable incoming mail directly to a list or a calendar. This is a very useful feature for your SharePoint 2010 environment as it can enable your users to send documents directly to a list and send meeting requests to a shared SharePoint calendar. The benefits of sending meeting requests to a shared SharePoint calendar is that your users may have a requirement to show the meetings that are taking place for a certain project or office depending on how your site is being used.

Before I go through the steps in how to set this up, you need to be aware that the shared Calendar in SharePoint is not stored in Exchange. It is stored in SharePoint along with are any attachments that are sent to the shared Calendar.

Please note that I am not going to include the steps of creating the Directory Management Service which will enable SharePoint to be able to write to Active Directory. I will be covering creating the SMTP Service on the SharePoint servers, configuring the SMTP Send Connector in Exchange, configuring Incoming Mail in Central Administration and enabling incoming mail in your list/calendar. This will include ensuring that your mail address will be using a friendly name e.g ‘@mail.contoso.com’. If you wish to find out more about how to set up Directory Management Service with SharePoint then I can recommend SharePoint George’s blog.

Step 1: Configuring the SMTP Service on the SharePoint Server(s)

The first step is to set up the SMTP Service. This needs to be set up on your SharePoint servers that you have designated to handle the mail (eg web front end servers).

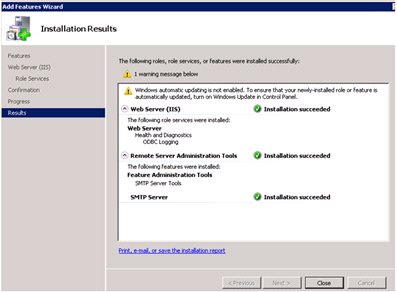
SharePoint 2010 requires the SMTP Service to be running, so you need to go to Features in Server Manager and install the SMTP Service on your Windows Server 2008 R2 server.

Once installed you will get the results screen to show a successful install.

Now open the IIS 6.0 Management Tools from Administrative Tools and configure the SMTP Service.

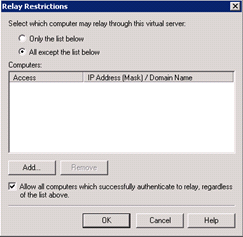
Go to the properties of the ‘SMTP Virtual Server’, click on the General tab and enable logging for troubleshooting. Then click on the access tab and enable “Anonymous access”. On the same tab, go to “Relay” and select the settings in the screenshot below.

Now go to messages and set the relevant settings for your organisation, an example is in the screenshot below. Then go to the Delivery tab and you can make the settings as you desire. I have gone for the default settings.

On the Security tab add the service account this is running the SharePoint 2010 timer service. This is the SharePoint service account that will be accessing the SMTP service to collect the mail. Ensure the same service account has read/write permissions to the mailroot folder (C:\InetPub\Mailroot). This will enable mail to be deleted once the timer service has collected the mail item.

Your SMTP Service will now look like the image below.

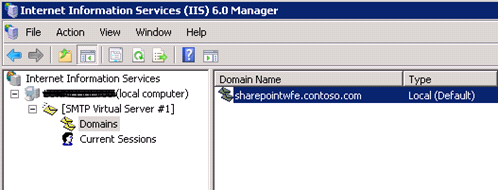
The domain name is automatically set as the ‘servername.domain’. The domain name is what is specified in the incoming email settings in Central Administration, so we need to ensure this is a friendly name for the users. In IIS 6.0 change the domain name to a friendly name e.g ‘mail.contoso.com’. This is important as the same name will need to be specified as the name of the Address Space in the SMTP Send Connector and the Incoming Email settings in Central Administration. So it needs to be a functional and user friendly name. Nb: The Domain Name does not need to be registered in DNS as a host record or MX record as Exchange will handle the address space.

Step 2: Configuring the SMTP connector to send mail to SharePoint.

The next stage is to enable mail to be routed to your SharePoint farm from Exchange. This is configured in the Exchange Management Console using the SMTP Send Connector. The SMTP Send Connector effectively routes mail to the relevant SharePoint Servers hosting the SMTP service (configured in step 1). Before you create the SMTP Send Connector, in DNS create an MX record for each of your SharePoint servers hosting the SMTP Service. The MX records needs to have the same naming convention for each SharePoint Server. An example is below:

MX Record ‘sharepointmail.contoso.com’ mapped to ‘sharepointwfe01.contoso.com’, with cost of ’10’

MX Record ‘sharepointmail.contoso.com’ mapped to ‘sharepointwfe02.contoso.com’, with cost of ’10’.

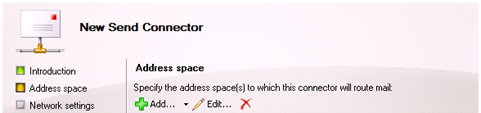
In Exchange Management Console, create a SMTP Send Connector with a useful name e.g ‘SharePoint 2010 Incoming Mail’.

In the address space, specify the address space name that you wish to use. E.g ‘mail.contoso.com’ with a cost of ’50’.

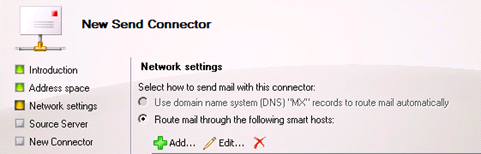
In the Network Settings, specify to use ‘Route Mail through the following smart hosts’ and add the name of the smart host which is the name of the MX Records. E.g ‘sharepointmail.contoso.com’.

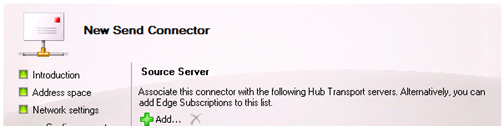
In the Source Server section, add the relevant Mail servers that you wish to associate to the Send Connector.

Nb: If you have two or more servers and want to send mail to one server first, then specify the server1 with a cost of 10 and the server2 with a cost of 20. Mail will go to server1 first and then to server2 second if server1 is unavailable. This will need experience of the Exchange and AD as the cost is associated to the MX Record.

Step 3: Configuring SharePoint to use Incoming Mail

The penultimate stage is to configure SharePoint with the relevant incoming email settings and enable incoming mail on your document library or calendar. To do this, go to Central Administration, System Settings and Configure Incoming Mail. Turn the feature on and specify’ Advanced’ rather than ‘automatic’.

Specify ‘No’ for the Directory Management Service

Specify the mail server display name as ‘mail.contoso.com’. This is the same name as the SMTP Send Connector and the Domain Name in your SMTP Service so it is important to keep the naming convention consistent. This will be the name space for all your email address that you create for your document library or calendar.

Specify the drop folder as ‘C:\inetpub\mailroot\drop’. This is the folder where Exchange will drop the email\calendar item. The item will then be picked up from the SharePoint 2010 Timer Service and inserted into the relevant document library or calendar.

Step 4: Enable Incoming Mail on your Calendar or Document Library

The final stage is to now enable incoming mail on your calendar or document library. This can be done by going to the ‘List Settings’ of your doc library\calendar and under communications select ‘Incoming Email Settings’ and in the incoming email section type the name of your email address. For this example I have used ‘calendar@mail.contoso.com’. This will ensure that all meeting requests that are sent to this address will be added to the calendar.

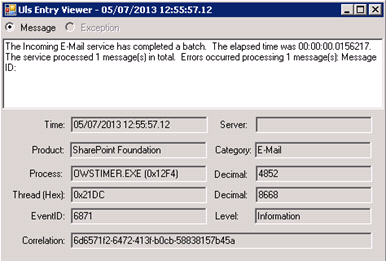
If you would like to monitor the mail progress then I would recommend monitoring the drop folder for the first couple of test emails\appointments to ensure the item is dropped in that directory and collected by the timer service. Please note that the timer job ‘Microsoft SharePoint Foundation Incoming E-Mail’ checks the folder every couple of minutes to collect mail.